共计 4137 个字符,预计需要花费 11 分钟才能阅读完成。
初始化
准备
使用的是 windows 电脑
- 1. Hexo.exe
- 2. git
- 3. Cloudflare 账户和域名
- 4. VsCode
- 5. npm
- 6. yarn
开始
- 1. 在 Github 上创建2个仓库:
– remote-blog
– xxx.github.io - 2. 将remote-blog 仓库 git clone 到本地。
- 3. 打开 Powershell,将工作路径定到remote-blog,输入
\xxx\hexo.exe init将仓库初始化,后面再调用hexo.exe 将写为hexo。
- 4. 输入
sudo npm install --save使用 npm 下载相关组件
- 5. 创建remote-blog/.github/workflows/xxx.yml文件,用来调用 Github Actions 自动化部署
- 6.
name: Pages
on:
  push:
    branches:
      - main # default branch
jobs:
  build:
    runs-on: ubuntu-latest
    steps:
      - name: Check Out
        uses: actions/checkout@v4
        with:
          token: ${{ secrets.BLOG_TOKEN }}
          # If your repository depends on submodule, please see: https://github.com/actions/checkout

      - name: Use Node.js 20
        uses: actions/setup-node@v4
        with:
          # Examples: 20, 18.19, >=16.20.2, lts/Iron, lts/Hydrogen, *, latest, current, node
          # Ref: https://github.com/actions/setup-node#supported-version-syntax
          node-version: "20"

      - name: Cache NPM dependencies
        uses: actions/cache@v4
        with:
          path: node_modules
          key: ${{ runner.OS }}-npm-cache
          restore-keys: |
            ${{ runner.OS }}-npm-cache

      - name: Install Dependencies
        run: npm install

      - name: Build
        run: npm run build

      - name: Upload Pages artifact
        uses: actions/upload-pages-artifact@v3
        with:
          path: ./public

      - name: Deploy to GitHub Pages
        uses: peaceiris/actions-gh-pages@v3
        with:
          personal_token: ${{ secrets.BLOG_TOKEN }}
          publish_dir: ./public
          external_repository: xxx/xxx.github.io # 更改为你的 GitHub Pages 仓库, username 是你的用户名
          publish_branch: main # GitHub Pages 分支
      - name: Deploy to Cloudflare Pages
        uses: cloudflare/pages-action@v1
        with:
          apiToken: ${{ secrets.CF_TOKEN }}
          accountId: ${{ secrets.CF_ID }}
          projectName: ${{ secrets.CF_NAME }}
          directory: ./public
wranglerVersion: "3"- 7. 将修改 push 到 Github 上,此时应该能正常调用 Github Actions 但是因为缺少参数无法继续。
[Blog_Token]: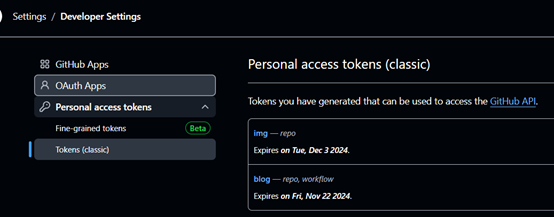
在这里生成一个拥有权限的Token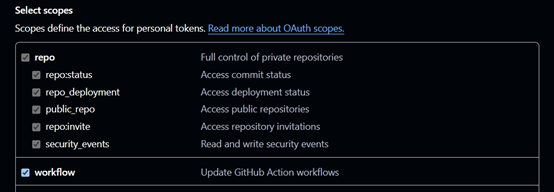
[CF_ID]:
[CF_Name]: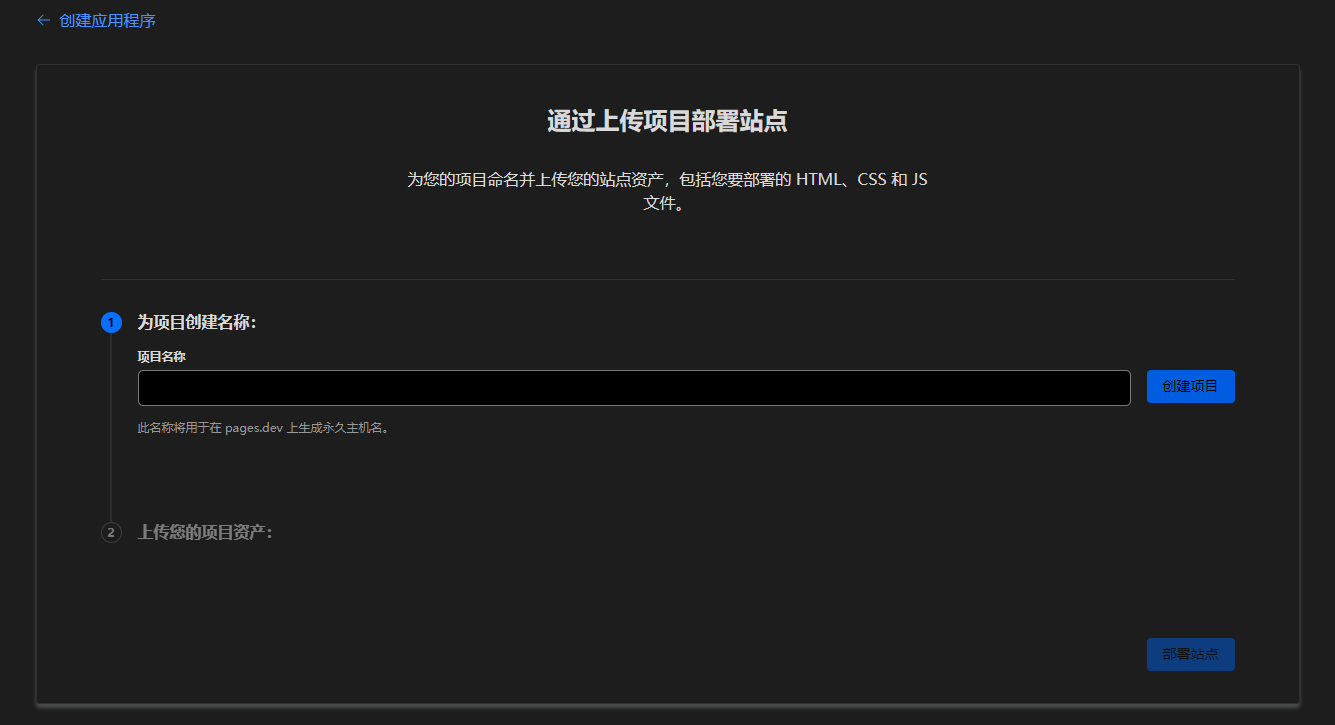
[CF_TOKEN]:

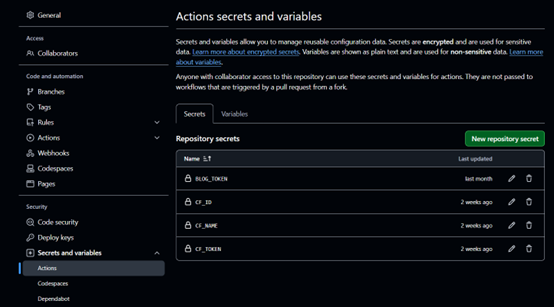
- 8. 到此基础 Hexo 博客已经搭建完成了。后续还可以对 Hexo 使用主题和插件等方便使用。
部署
因为使用的是 Github Actions 自动化部署,所以在本地驶入 git push 并回车就会触发 Gihub Actions 推送到 Github Pages 和 Cloudflare Pages。
正文完